


Guest author Tawni Moore of Backwards Distilling Company and @punxsutawni
Product, food, and beverage photographer with a fondness for scouring thrift stores for funky finds, coffee mugs and any kind of cactus plant willing to come home with her. Tawni's photography style is dark and shadow-filled. Tawni's friend recently called her “her most hipster pal” and she couldn’t be more proud.
Dark + Moody versus Light +Airy Photography
You’ve stumbled upon this little jig because you (like me) are interested in a dark and moody photography style. I've been captivated by dark backgrounds and foregrounds ever since I began styling food and beverages.
Photographing food, drinks, and products against bold black and gray backdrops can make them look sultry and attractive, and make colors pop. In this how-to, I'm going to focus on how to achieve dark and moody photos with a DSLR camera. I’ll be going over the equipment I use, behind the scenes of my setup, and some helpful editing techniques to help you get your dark and moody dreams to fruition. Plus we'll do some fun stuff with the lights off and some twinkle lights for a little potion making with Harry Potter’s wand!
If you're a phone camera photographer: consider investing in an inexpensive DSLR camera. I've tried taking dark and moody photos on my phone camera and the photos just didn't measure up to what a DSLR can do. That doesn't mean you need something crazy expensive - having an understanding of how to use manual mode on even the cheapest DSLR can make a big difference in your photos. If you DO want to try capturing dark and moody photos on your phone camera, I recommend using an app like Camera+2 that let's you manually control the aperture, ISO, and shutter speed. Try the techniques I talk about and see if it works for you.
For an awesome how-to on light and airy photography, click here.
Setup

Backdrops
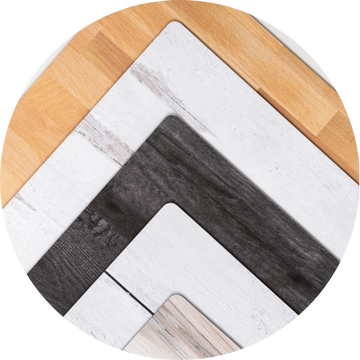
First things first, you need Replica Surfaces! I love the combo of Slate and Weathered Wood together with my Replica Stands. I do have a handful of other Surfaces but they are all quite light compared to these two. I personally prefer a dark on dark OR light on light look. The exception I make to this is with my Concrete Surface. Concrete is so versatile! It goes well with either a light or dark style.
Camera + Lenses
Next, you’ll need a DSLR camera. I use a Canon 60D camera body, typically with my 50 mm lens but if I am doing a flat lay, I will use my 24 mm lens or the kit lens that came with my camera along with a step-stool to make sure I get my whole scene in frame. For flat lays, I prefer the kit lens because it is a zoom lens (versus the other two are fixed lenses). For any scenes using two Surfaces together in an “L-Shape," I always choose my 50 mm. I’ve included photos of both lenses taken with the other lens! Photos taken with the 50mm are closer to what the human eye sees. The 24 mm gives more of a fisheye effect, especially near the four corners of the photo and directly in the center. It appears a bit more warped.

Photos of a 50 mm lens taken using a 24 mm lens (left; note the fisheye effect) and a 24 mm lens taken using a 50 mm lens (right).
White balance
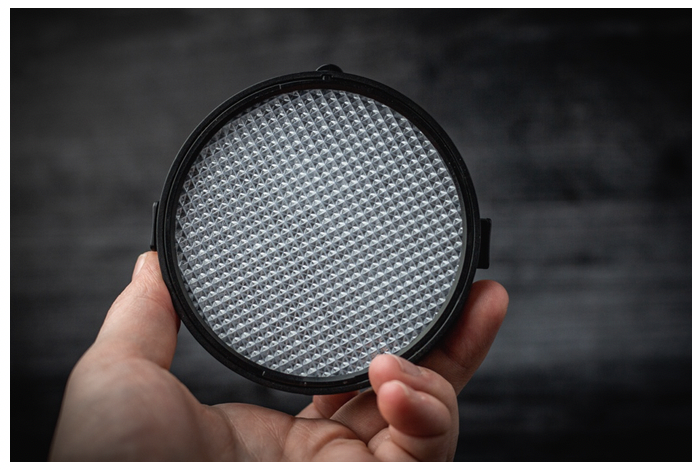
This is possibly my favorite piece of equipment! It's a little white attachment called an ExpoDisk and it's been my saving grace for years because it allows me to absolutely nail my white balance in camera without having to do much white balancing in Adobe Lightroom. I got mine on Amazon for around $50 and it has absolutely paid for itself in time not spent color correcting my photos. I’m not even sponsored, I just love this product SO MUCH!
I actually forgot to use my ExpoDisk while shooting this apple pie, but it ended up being a wonderful way to show you what a photo can look like with and without one. As you can see in the comparison shot, the first photo without the ExpoDisk has an odd yellow hue to it. Now imagine if that was a person or your product instead of a pie, YIKES! Both of these photos are unedited.
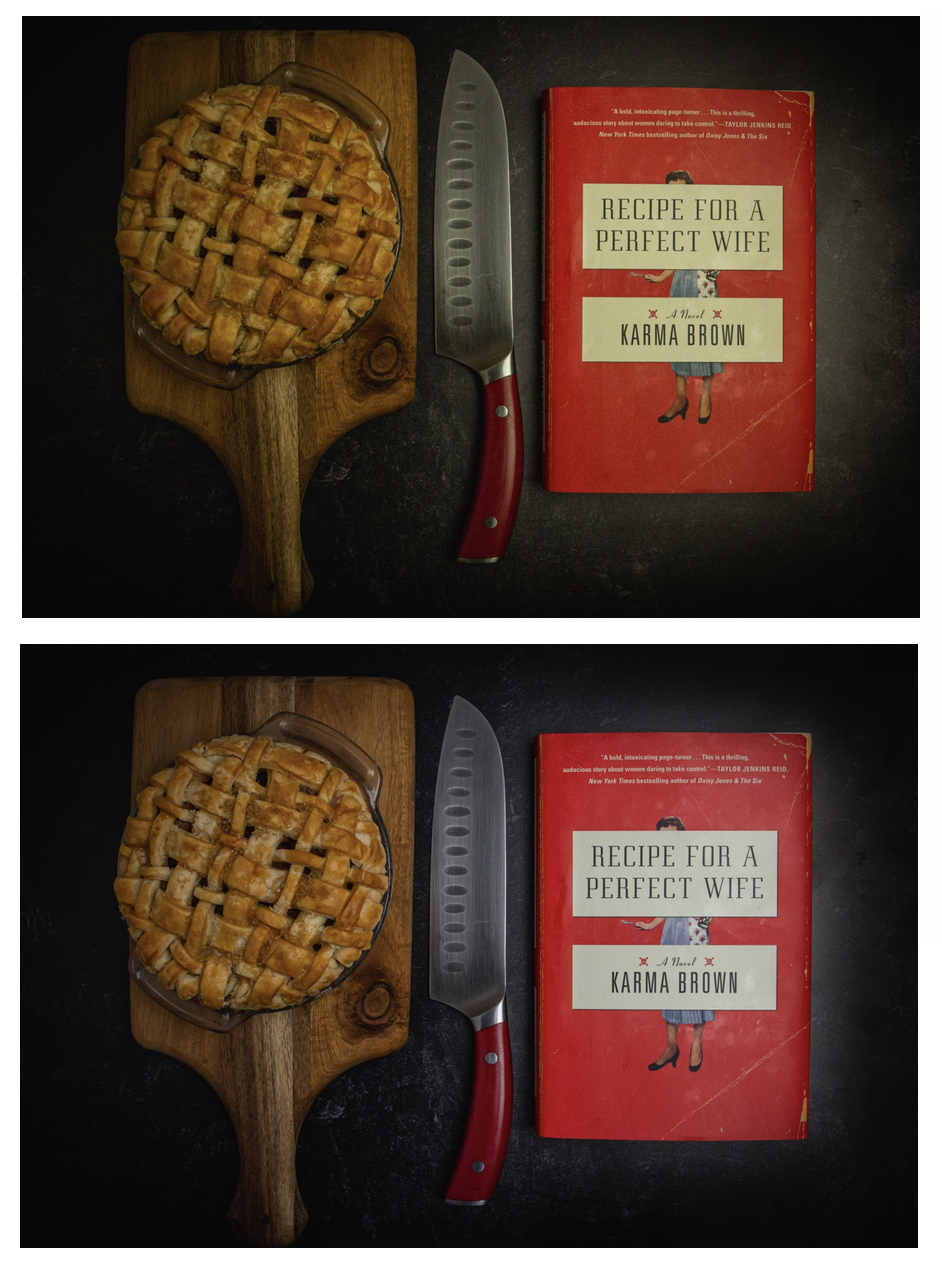
Without ExpoDisk (top) and with (bottom). See the difference it makes in the color of the crust and the title of the book?

Tripod
Next up, we have a tripod! If there’s anything I’ve learned over the years, it's don’t get a cheap tripod. It will end up breaking so just save yourself the trouble, heartache and money by investing in a quality tripod the first time around! This is the tripod I use, and it has never let me down! You can see the top part in this behind-the-scenes iPhone snap. The center column rotates so you can also position your camera above your Surfaces and shoot downward to take flat lay shots without worrying about motion blur from your hands moving.
Lighting
The lights in my room are VERY orange so anytime I’m shooting on my Surfaces, I try to find a room where I can shut off the lights entirely. I like the room to be completely dark except for my artificial light because I don’t want any extra orange, yellow or blue hues in my photos from other light sources.
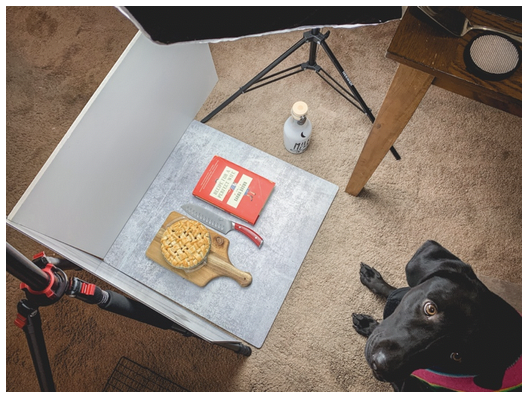
For cocktail photos, I was having a hard time fighting weird reflections in my glassware. I decided to order an inexpensive soft box and light setup. For less than $50, I purchased this single light with 5 bulbs and have been very happy with it! My dog chewed up the cord after about a week of owning the light (this is as close as Lola will get to my flat lays now! Such a good/bad dog) and the day before that, I backed over the light stand while loading my car after a session *facepalm.* BUT after replacing both the cord and the stand, I haven’t had a single issue! Even with a pie on the floor and a curious doggo on the loose.
Bounce boards (aka reflectors)
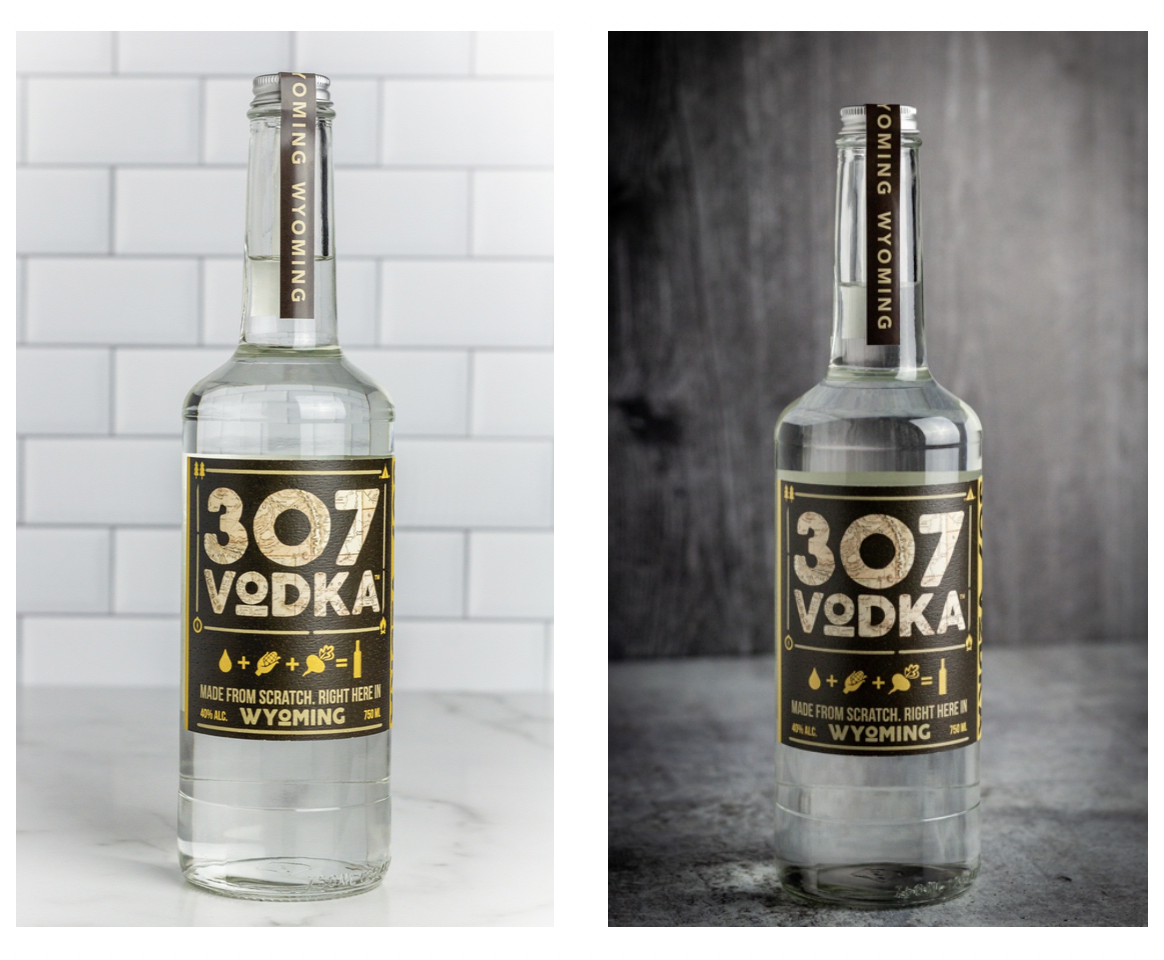
My last pieces of essential equipment are two foam boards from Hobby Lobby: one white, one black. I place them opposite my soft box to bounce light onto the side of my scene that the light doesn’t hit directly. You can see in the two photos below that the white board brightens the right side of the bottle, while the black board deepens the shadow. To hold up my bounce boards, I use an old (and very poorly made) tripod since I do not trust that tripod to do or hold much else!
The beauty of practicing dark and moody photography is that every scene requires a different amount of shadow and light to make it visually enticing. How you achieve that is up to you and your creativity.

With a white bounce board along the right side of the scene (left) and with a black bounce board along the right side of the scene (right). Note that the white board brightens the right edge of the bottle while the black board deepens the shadow.
Camera settings: ISO, f-stop, and shutter speed
I know I know, these terms can be super scary. Especially if you’re just taking your new (or gently used) DSLR camera out of the package and trying to shoot on manual mode for the first time. Once you figure out how these three functions work together, your game will be changed. If the terms are new to you, Mandy explains them all here. I recommend reading her how-to and then coming back to this one so I can show you how changing each one changes the look of your photos.
ISO
I keep my ISO fairly low (between 100-400) at all times when I am shooting with my soft box light setup. ISO adds graininess to photos so I avoid it at all costs. To get the right exposure, I focus on adjusting shutter speed and f-stop.
Aperture (f-stop)
Your aperture (which is controlled by your f-stop) is essential to mastering your product shots. I used to think that I needed the absolute widest aperture (lowest f-stop) to create that gorgeous blurred, bokeh effect in my photos. But when you're photographing small objects rather than people, those really low f-stops make it hard to keep your whole scene in focus. Now that I've gotten more experience, I'm partial to an aperture of about f/5.6 to f/8 for my photos. The photos below show you some examples of increasing f-stop while keeping ISO constant and decreasing shutter speed to maintain a constant exposure. And by the way, there are many more stops than this! This is just a select few to show you how the level of background blur changes. Note that at f/2.5, the background is quite blurred and at f/22, it's completely in focus.


Shutter speed
Once you've decided on the f-stops you like, you'll want to select a shutter speed that gives you a proper exposure without having to increase your ISO to the point of graininess. The trick I’ve found to nailing my dark and moody images is to intentionally underexpose my image in the camera. This means that when I am choosing a shutter speed to match my f-stop, I am looking through my camera viewfinder and measuring the light in my scene with a tiny red bar with measurements from -3 through +3. Most of my images are exposed at least one full stop below what my camera detects as 0 or a "perfect exposure". This gives me room to brighten it up or play with the shadows in Lightroom.
These photos show you what happens to exposure when you keep ISO and f-stop constant (I chose f/7.1) and decrease shutter speed to let more light in.
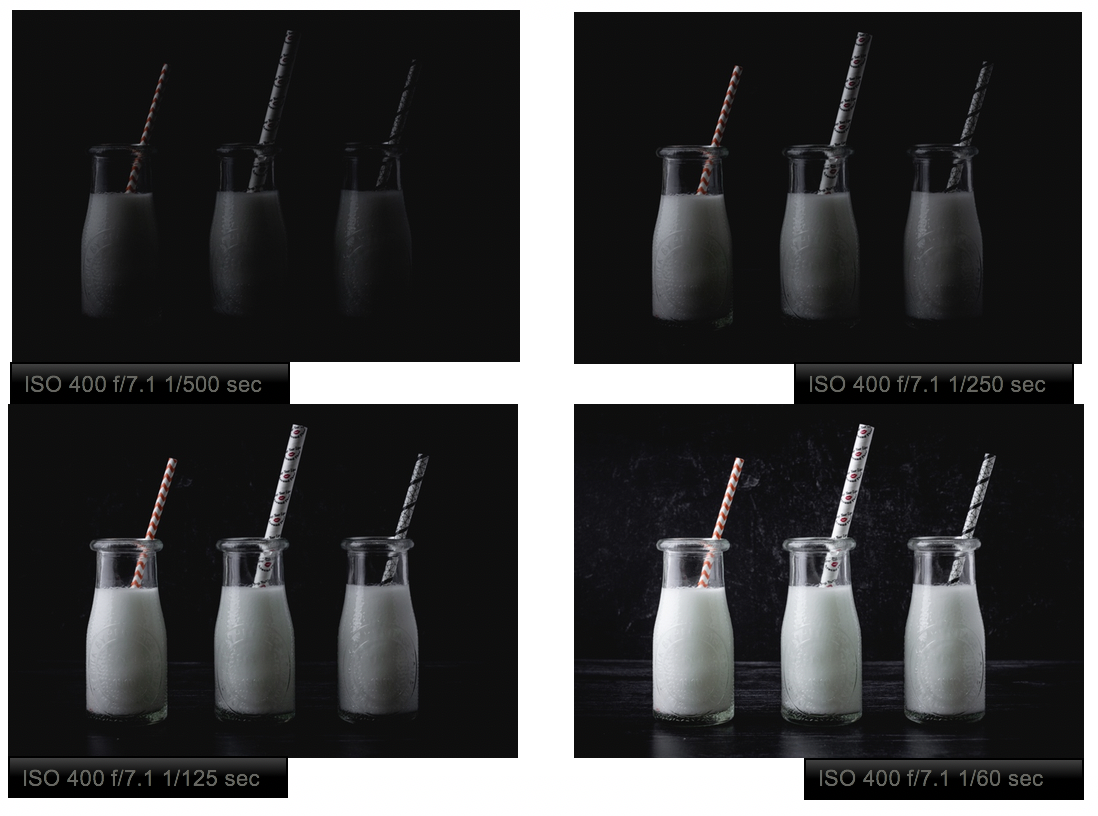

While this last photo (taken at a shutter speed of 1/50sec) is closest to a "perfect exposure" according to my camera, I prefer the 1/60sec or 1/125sec exposure because it gives me more room to play in Lightroom. It’s usually better to underexpose your photos than it is to overexpose. You can bring back areas that are too dark because the camera still registered the information if you shoot in RAW. If you let in too much light, there’s no information in the white areas of the photo and no room to edit them in Lightroom.
Post-processing
Adobe Bridge, Lightroom, and Photoshop
These three programs are essential to my post-processing workflow! Adobe Bridge is what I use to cull through my photos in a slideshow on a large screen so I can see which photos are clear, in focus, exposed properly, and up to my standard. I end up with anywhere from 15-50 images from any given scene and I try to shoot multiple scenes at a time, which means sifting through hundreds of photos. I sort through, delete especially bad ones, and rank the final ones on a 1-5 star scale. The 4-5 star ranked photos are uploaded into Lightroom for their first round of editing.
If I need to do any heavy editing (like skin retouches or something that requires a heavier hand than Lightroom), I will use Photoshop. For all the images used in this how-to, I did not use Photoshop because Lightroom is a very powerful application on its own! Mandy has a YouTube video all about Lightroom basics right here.
For the next section, I only used Bridge to view and import, and then Adobe Lightroom for desktop. I changed colors and curves and basic edits all in Lightroom. After about 10 attempts of unplugging lights and swirling a light wand around (you’ll see) I ended up with the final result!
And now for something a little different...

How did we get this? It’s quite interesting to play with other light sources in low light situations to create magical images. And I did it with a little tool that cost me $3.00! I had some leftover wire twinkle lights from a boudoir shoot so I wrapped them around a plastic straw to create a wand of lights.

To create the shot, I used the same L-shape Surface setup on a table (the one I showed you above when I talked about tripods) but pulled my soft box further away from my Surfaces so that I could stand next to the scene. I set my camera up on my tripod and set the shutter on a ten second timer so that I had time to allow my studio light to shine on the scene for about 2 seconds. I quickly walked into scene and waved the light wand behind the scene in the dark until the shutter closed. My hand was in frame but it doesn't appear in the photo because the shutter speed was so long. I had some dry ice bubbling away in the skull but by the time I got a light pattern that I was happy with, it wasn’t creating much fog anymore. Oh well, next time!
To give the light a red color rather than its natural yellow/orange color, I adjusted the Hue and Saturation in Lightroom. I spent most of my editing in this menu just to really work with colors that I found appealing. I also used the Vignette function under the Effects tab to add a vignette around the edges and draw your attention to the mystery held within my scene.

Unedited (top left), after making adjustments under the Light tab (top right; ok I changed the blue liquid to purple too), and after adjusting the color of the light swirl (bottom).
I hope you found some interesting tips and tricks to help you start creating dark and moody images! I love a light and airy scene but there’s just something that draws me deep into a dark image. Sounds like a mystery for Scooby and the Gang to solve! While they crack the case, I’ll be coming up with more dark and moody ideas to shoot on my Surfaces. Until next time, my friends!

I would love to know what the recipe is for the cocktail in the first photo. It’s the perfect time of the year for it! Thanks!