


Alright guys, this is the photography how-to you've been waiting for - a how-to for everyone who takes backdrop-based photos, no matter what camera you use (DSLR or phone) or what you shoot (food, products, handmade items, anything).
We're going to be talking allll about how to position objects and choose camera settings to create a shallow depth of field that keeps your subject in focus and your background blurred - a little something I like to call "depth perfection."
Prefer your how-tos in video form? You better believe I've created a YouTube video full of behind-the-scenes clips and animations that really hammer these depth concepts home!
Prefer to read your how-tos? Let’s jump right in!
There are two major contributors to depth in a photo: subject positioning and camera settings.
Subject positioning
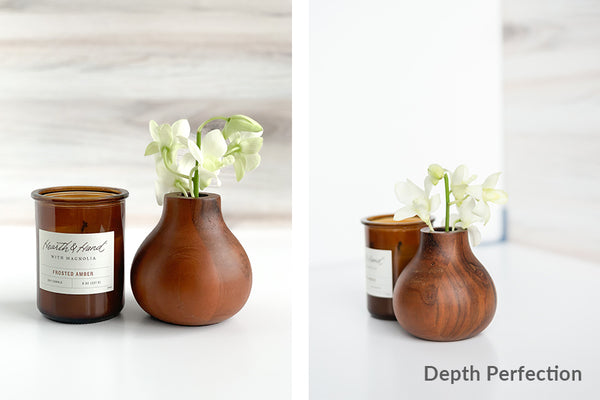
Whether you shoot with a DSLR camera or a phone camera, the goal when shooting at eye level is to keep your subject IN focus and your background (which includes your vertical backdrop and any styling props you choose to place behind the subject) OUT of focus.
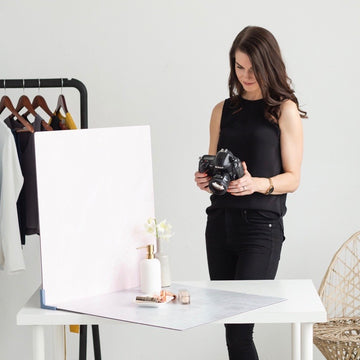
To achieve this, position your subject in the CENTER of your horizontal Surface, as far forward as you can without the front edge of the horizontal Surface showing in your shot.
Subject placed in the center of the horizontal Surface. As a side note, the vertical Surface that's facing the window is a second All-White Surface leaned against the other two Surfaces. I'm using it as a reflector to create even light across the whole scene. If you don't have the All-White Surface (or are using it in your shot), a piece of white poster board or a trifold poster board (which stands up on its own) work just as well.
The depth created when subjects are positioned centrally
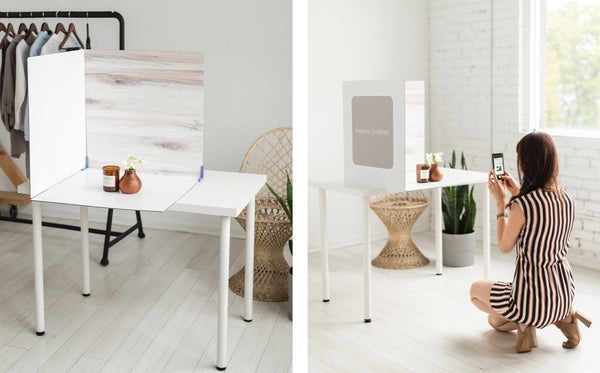
A common “mistake” is to place your subject directly in front of your vertical backdrop. This prevents your background from becoming blurred and eliminates the perception of depth. This photo demonstrates the difference that positioning makes.

Zero depth when subjects are placed too far back
Camera settings
Prior to the iPhone 7 Plus, depth was incredibly difficult to attain on a camera phone because the background was always in focus. This made blurring apps necessary. But then the iPhone 7 Plus (and its glorious portrait mode) entered our lives and made it possible for us iPhone photogs to take truly stunning photos!
Let’s talk about the settings you need for different camera types.
If shooting with a DSLR camera…
Creating depth with a DSLR camera is all about your f/stop (short for focal-stop). F/stop controls the size of your aperture, which is the opening in your camera lens that lets light in. Smaller f/stops (like f/2.8) allow more light through while larger f/stops (above f/8) allow less light through.
To keep your background out of focus, you want to create a shallow depth of field by choosing a small f/stop (remember that smaller f/stop = larger aperture = more light through). Next you’ll want to select your shutter speed. Shutter speed and f/stop are related. Since a smaller f/stop lets in more light, you’ll need to offset that by choosing a faster shutter speed (1/250s or faster) to prevent overexposure from letting too much light through.
Finally, set your ISO to 100. The ISO controls the sensitivity of the image sensor, so the higher the ISO is set the noisier (or grainier) the whole photo will be. 100 is typically the lowest ISO you can set a camera to, so set it there if you can.
If shooting on an iPhone 7+, 8+, or later…
The beauty of newer iPhones is a little something called portrait mode. Portrait mode uses machine learning to create an artificial depth of field which blurs the background and foreground to create DSLR-like photos. Portrait mode is available on iPhone 7+, 8+, and newer. Unfortunately it isn't available on iPhone 8.
Open your camera app and select portrait mode. If using the iPhone 8 Plus or later, little cube icons will appear at the bottom of your screen. Select natural light. This is the basic lighting mode that portrait mode uses and will keep your subject in focus while blurring the background.
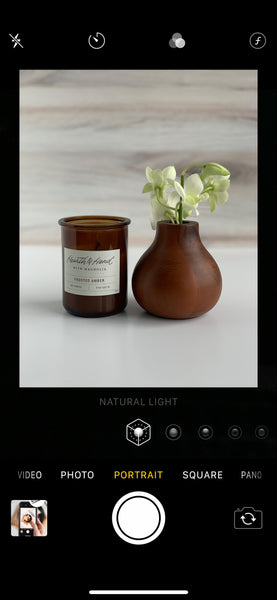
What you see when you open portrait mode. Side bar: Once you’re comfortable with natural light mode, you can play around with studio light mode (your subject will be more brightly lit), contour light mode (will cast shadows on your subject), and the other lighting modes.
If the message “move farther away” appears at the top of your screen, slowly move your phone backward until the message goes away and you suddenly see the background blur. If you had to move the phone too far backward before seeing the message go away (i.e. you moved so far back that the front edge of the horizontal Surface is now visible in your photo), slowly move the phone forward until the Surface edge is no longer in frame but the background remains blurred.
There IS a sweet spot and its location will surprise you! Why? Because portrait mode requires you to move pretty far away from your subject before it can blur the background, but then it allows you to move decently far forward before the background pops back into focus. If that explanation sounds confusing, try it for yourself and you’ll see what I mean!
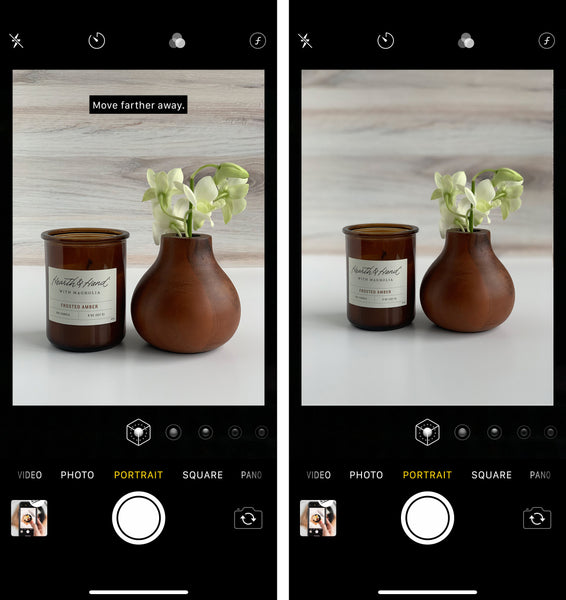
Too close for portrait mode to kick in (left) and with portrait mode active (right). This is exactly what these photos looked like when taken in the massively bright room pictured above. Neither have been edited in Lightroom yet.
Once portrait mode is active, tap your subject on the screen to put it into focus. A box with a sun icon next to it will appear wherever you tapped. Drag the sun icon up and down to change the exposure (the brightness of your photo). When you like what you see on your screen, snap your photo! Editing in a program like Lightroom is optional but highly encouraged - I think you'll be amazed at the difference a little editing can make. Too see the difference, compare the "depth perfection" photo at the top of this page and the photos pictured on the iPhone.
If shooting on an iPhone 7 or earlier (or a phone without a portrait mode equivalent)…
I gotta tell you, I'm not sure. I've only ever used an iPhone so I'm not familiar with portrait mode equivalents on other phone models. I'd love to recommend a third party app that works on all phone models, but unfortunately aperture (which is responsible for shallow depth of field) is fixed on most phone cameras and can’t be controlled manually, even with a third party app. My best recommendation is to open the camera app on your phone and click around. If you can't find one, Google is your friend! I'll update this section if I get my hands on another phone model in the future.
Got it? Great! Now go blur it up! Then comment below and let me know how it went.

I’ve wanted to know how to do this forever. Thank you!